How to enable HD settings on PCsUpdated 3 years ago
Activity:
How to enable HD settings on my PC
Operations Systems:
Windows 7, 10, 11
Details:
This is how to adjust the HD settings on your PC.
This may be needed If your camera or images aren't displaying in HD or if your monitor is not refreshing quick enough for HD images. Examples of poor performance include horizontal or fluorescent lines on your monitor.
Best path for Most PCs:
- Right-click an empty area on the desktop, and click Display Settings.
- In the left pane, click on Display.
- In the right pane, scroll down and click Advanced display settings.
- If you have more than one monitor connected to your computer, then select the monitor on which you want to change the screen resolution.
- Click the Resolution drop-down menu, and then select a screen resolution. For example, 1920 x 1080.
Alternate Path on Windows 10 & 11:
- Select Start.
- Find and click on System.
- Find and select Display to adjust resolution:
- Screen resolution - Find the drop-down menu under Display resolution.
- Note: Windows recommends you use the Recommended resolution. Changing the resolution may lead to blurry or pixelated images.
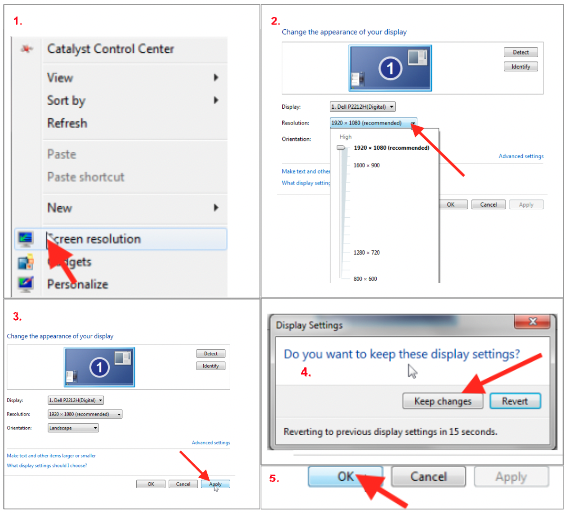
For Windows 7:
- Right-click on the desktop of your computer and select "Screen resolution".
- Click the drop-down menu labeled "Resolution" and use the slider to select the desired screen resolution.
- Click "Apply".
- If the video display of your computer looks the way you want it to look, click "Keep changes". If the content on your screen does not look right, click "Revert" to go back to the previous setting
- Once you have set the proper screen resolution, click "OK" to save your changes.